When you start tinkering with micro-controllers, one of the most important tools you will have in your toolbox is a chip programmer. There are a lot of programmers for different types of micro-controllers. So the type of programmer you have depends on the type of micro-controller you want to program. For example, 8051, PIC, AVR and ARM are examples of microcontrollers. In this study, we are going to see how to use an Arduino Uno as an In-System programmer for AVR micro-controllers. An example of an AVR micro-controller is the Atmel 328P micro-controller that is found in the Arduino itself. Another example is the popular ATTiny85 micro-controller.
Of course there are programmers built specifically for programing AVR micro-controllers but in this post, we will be using an Arduino Uno as the AVR programmer.
Required Components
| Arduino Uno x1 | Buy here |
| 220 ohms resistor x3 | Buy here |
| Red LED x1 | Buy here |
| Yellow LED x1 | Buy here |
| Green LED x1 | Buy here |
| prototype board + wires | Buy here |
Configurations
To use an Arduino for programming micro-controllers, you need to setup the Arduino as an In-System Programmer. To do that, you will load the ArduinoISP sketch (program) into the Arduino. Follow the steps:
Step 1: Open the Arduino IDE. Select File->Examples->ArduinoISP->ArduinoISP

Step 2: Connect the Arduino to be used as a programmer to your computer.
Step 3: Confirm / Select the port that right port that the Arduino board is connected. Tools->Ports

Step 4: Verify and Upload the sketch (program) into the Arduino.
Bravo! Now you have an AVR programmer. We will be using this Arduino based AVR programmer to program our micro-controllers or even other Arduino boards.
Monitoring programing status
If you want to monitor the status of your Arduino based AVR programmer during a programming process, you can connect three LEDs to the Pin 7, 8, and 9 of the programmer as in the diagram below.

The Arduino ISP sketch that we uploaded into our Arduino based AVR programmer is pre-programmed for this functionality.
Pin 7 = Programming (Turns on during programming)
Pin 8 = Error (Turns on in case of programming error)
Pin 9 = Heartbeat (Stays on once the programmer is powered on)
Connecting your AVR Programmer to the target Micro-controller

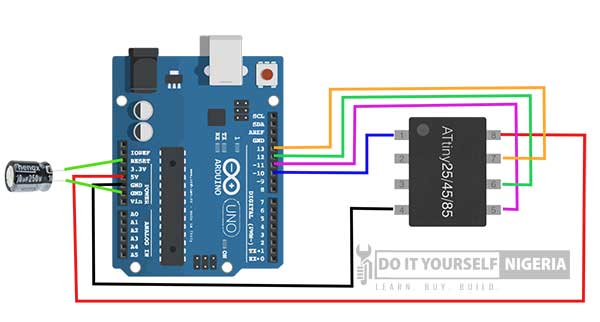
To program any AVR microcontroller with your programmer or another Arduino board, you need to match certain pins of the AVR programmer to the target microcontroller. On AVR Programmer pins 10, 11, 12 and 13 are used as data pins. The configurations are as follows:
Pin 10 = RESET
Pin 11 = ICSP-4 = MOSI
Pin 12 = ICSP-1 =MISO
Pin 13 = ICSP-3 = SCK
ICSP Pin Layouts

Also it is recommended to connect the 5v and GND pins of the AVR Programmer to the 5v and GND of the target micro-controller if we are programing another Arduino board.
After making the connection between the AVR programmer to the target micro-controller, you need to define in your Arduino IDE that you are using the Arduino as ISP as the Programmer. Go to Tools->Programmer->Arduino as ISP.

Example connections between the AVR programmer and Target micro-controllers
Arduino Uno

Atmel 328P

ATTiny85,

Note: The examples diagrams above assumes we are using the programmer to burn bootloaders into the target micro-controllers. In a situations where the target micro-controller already have a bootloader and you are using the programmer to upload a sketch to the target micro-controller, you have to remove the Atmel 328P in the programmer.
If you like this tutorial, you can share it with your friends using the social media buttons and if you have built the circuit or have any question, tell us using the comment box below. Thanks for reading.

